|
This article or section needs to be cleaned up to conform to a higher standard of quality.
See this article's talk page or the editspace comment following the tag for details. |
- See also: Stop the Collectors
A Collector ship has been found floating adrift, evidently damaged by a turian patrol. This is a rare chance to examine Collector technology.
Acquisition
This mission is automatically triggered once you have completed any five possible new missions after completing the Horizon mission, whether they be loyalty missions, recruitment missions or even anomaly missions. The Illusive Man informs Commander Shepard that a turian patrol has managed to disable a Collector vessel, and that they should take the opportunity to investigate.
This mission requries at least one completed loyality mission to activate.
Walkthrough
Cruiser Entrance
This mission is probably the most linear of the game. When you start moving down the open hall way, there is no need to worry about any enemies for a while so take it easy so you can move at a steady pace. Upon arriving at a U-turn you encounter a pod where your squadmates will make some comments. Keep moving down the hall until you reach a pile of dead bodies, you can earn some morality points depending on your choice. Continue down the tunnel until you reach some Collector equipment on the right, salvage it and move up to get the med kit. Moving along you reach the body of a dead Collector in a pod. Save your game before you select it.
When you select the pod you will be contacted by EDI she will tell you about the experiments. Apparently, the Collectors were experimenting on how similar their DNA is to humans. The conversation shifts to the Normandy’s Cockpit where a holographic display and EDI’s analysis states something shocking. The Collectors are actually protheans! That response is what you choose it to be. You can ask questions until you are satisfied then end the conversation then you shift to the upgrade.
Advanced Weapon Training
After the conversation, a menu will appear allowing you to choose one of three weapon training options, and allow Shepard to use the weapon in combat. If your character already has that weapon proficiency, you instead have the option of choosing a powerful unique weapon of that class. For example, an Infiltrator will have the option to take the unique sniper rifle or gain access to the common assault rifles or gain access to common shotguns. Adepts, Sentinels, and Engineers will only have options for weapon training, and not new weapons.
- Shotgun Training; Soldiers and Vanguards can choose the M-300 Claymore Heavy Shotgun instead.
- Assault Rifle Training; Soldiers can choose the M-76 Revenant Light Machine Gun instead.
- Sniper Rifle Training; Soldiers and Infiltrators can choose the Widow Anti-Material Rifle instead.
Both the training and new weapon only apply to Shepard, not to any other member of the squad. The best choice will depend on your character class and playstyle. Each unique weapon is generally considered the strongest of its class in the game; however, you may want to instead balance your weaknesses with a new weapon type. The training carries through with each additional new game; you don't get to pick another weapon on subsequent playthroughs, so choose wisely.
A nearby weapons locker allows you to change the squad's weapons loadouts. It is highly advised that you save your game at this point and do not overwrite it until you finish the mission. Grab the refined element zero before you continue on.
Into the Belly of the Beast
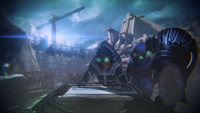
As you continue on to the fight after the turns is another piece of Collector tech, salvage it before continuing. Keep moving still no enemies for a little bit more. As you round the turn at the top you get a glance at some of the many pods that are onboard. Your squadmates make comments along the lines of how many are in the pods, but Shepard’s response is “Too Many”. EDI says that there is no life signs in the pods however that is some relief. However she mentions that they could have died when the ship lost power. A terminal at the end will give the Ablative VI/Damage Protection upgrade. As you walk up the ramp Joker comes over the comm and tells you that this is the same ship that both attacked Horizon, and EDI tells you it is also the attacker of the SSV Normandy. Shepard makes the comment that that is too much of a coincidence. As you round the corner at the top you get a glance into the massive open areas of the ship. Your squadmates will comment that the Collectors could harvest every human in the Terminus Systems and they still couldn't fill them all. The other comments that the Collectors are only after one target, Earth. Now you have yet another reason to stop them, if you didn't have enough already. Move along until you reach a glowing console. EDI will tell you that she can interface with it to get all the information they need. SAVE before you access the console.
Alert
Accessing the console sets up a link between EDI and the Collector Ship, and for a few seconds it seems to be going well, but when does anything go off without a hitch? Suddenly EDI says that her connection has been disrupted and there is someone else in the system. The scene will jump to the Normandy cockpit and the Collector General will appear in the form of a red hologram. Then the whole ship shakes and Shepard radios for a status report. EDI says that she managed to divert the overload to non critical systems and that it wasn't a malfunction, it was a trap. The the platform flies into the air as EDI attempts to regin control, apperently there is someone else in the system. When the platforms stops, everyone losses their balance and one squadmember is knocked down. Your regain contol as EDI says that she need to finish before she override any critical systems. She will keep you updated on the progress but it is really finished when you defeat all the Collector reinforcements that are coming up fast. So take cover and prepare for a hard fight.
Sky High Battle
The platform you are on provides some cover and a good position to combat the enemy. Two Collector drones and a Collector guardian drop in and take them out as fast as possible to prevent Harbinger from possessing them. More drones and guardians will continue to arrive as you combat. Move from cover to cover as you need to and don’t forget about your squadmates. Eventually two scions arrive with more reinforcements, focus on the Collectors before going after the Scions because Harbinger will take over if you don’t. On hardcore or insanity difficulty levels, a platform with a Scion stationed on it will slowly orbit the main platform cluster whilst you combat the other Collectors. Once the Scions and all Collectors are down, EDI radios that if you access the panel again she can regain control. Before you do, pick up clips, and some power cells on one of the platforms.
Access the panel to continue. You are rewarded with a ride before more action, during which EDI notices some errors in the distress signal that clearly identify it as a non-turian signal. Shepard asks if it is a mistake, EDI replies that the Illusive Man would have definitely noticed the difference. She discovered the error using Cerberus detection protocols that the Illusive Man wrote. The conclusion, he sent you into a trap. Respond to that any way you wish. Joker will then interrupt to tell you to hurry up because the cruiser is powering up its weapons. He will keep you updated over the course of the rest of the mission about their progress.
Fight Your Way Out
Save as often as you can from here to the end of the mission, especially on hardcore and insanity difficulties.
As you land get off the platform and move. Keep an eye out for enemies because now that they are alerted to your presence they will come out. Slam into cover at the first chance and shoot out the Collectors that appear. One will be possessed because there is just too many to take out fast enough. Focus on taking out Harbinger then focus on the other fodder in the room to prevent him from doing it again. Move up or move your teammates up as necessary to combat new arrivals. The Collectors here have a height advantage so turn it against them and move up. The best thing to do in this area is to keep in cover and move up as necessary. When the shooting stops gather come Collector tech and some medi-gel before moving on.
The next area you really have a fight on your hands. However, there is a lot of cover to take advantage of. Keep an eye on the Collectors because the Collectors will use the left side walkway to flank you. Watch out for Harbinger because you can bet he will make an appearance. Take out the Collector guardians before they land because they will set up shields the moment they land and are in cover. Those are hard to eliminate, especially when under fire and it is hard to flank the guardians without risking death. As with every battle so far, move and use powers as necessary to defeat your foes. Once done head to the other end of the room and pick up the power cells, medi-gel, and another crate of refined element zero.
SAVE YOUR GAME HERE
As you enter the next room EDI will come over the comm telling you that she has opened a door at the other end of the room. There are two problems, Collectors and husks block the way, and there is a praetorian as well. This battle is much different from the one on Horizon. The battle will not be easy because in addition to the praetorian, there will be other Collectors and Harbinger will make your life miserable if you don’t take them out first. The best thing is to have one squadmate focus on the praetorian and you and the other take out the Collectors, once down focus on the floating tank.
Use the same tactics as on Horizon, shoot it and deplete its barriers then hammer away at its armor. On hardcore or insanity, it is preferable to devestate the beast with a well-deserved Cain shot at the beginning of the fight. This will drastically shorten the fight and, if you're lucky, take out a few smaller enemies in the process (Just make sure to give the Praetorian a wide berth before shooting the Cain at it). When it starts to glow run away from it and keep moving. Use the height at the entrance of the room as much as you can to take out the praetorian. If you run out of heavy weapon ammo there is an ammo crate in the room at the bottom of the ramps inside the cover there that you can use to replenish the ammo. Once its armor is down finish it off, pick up ammo, the heavy weapon ammo if you didn’t already, and move to the door. Unfortunate the door will close as you approach it and EDI will divert you to a longer path around the obstacle.
The hallway has some Collector tech, salvage, and across from it is a research, Multicore Amplifier, increased tech damage. Save your game and continue. This next area contains probably the hardest fight of the station, next to the praetorian. Collectors will come at you in waves that include everything the Collectors have in their arsenal except another praetorian. The best thing to do is stay in cover and take out the enemies you can see without moving up. If you do there is a possibility of being overwhelmed and flanked easily. This room is also full of abominations and husks, don’t forget that abominations explode when killed. Keep in cover and take out the Collectors.
Once you move up go to the right and use the high ground to take out the Collectors. When moving to the high ground you will rushed by Collectors that will you try to prevent you from getting that ground. Take them out before they have to become possessed by Harbinger. Take out the Collectors and that is the end of the Collectors. Nevertheless, stay on your watch because that is not the end of the enemies. Once the Collectors are down head down the hall until you hear or see husks charging you. Backpedal and get into cover to eliminate the husks. Once the husks are down the way back to the shuttle is clear. A cutscene will play that covers your escape and your return to the Normandy
Normandy
Once back on the ship you are immediately taken into a conversation with the Illusive man. Since he sent you and your crew into a trap let him have it any way you wish. However he manages to get out that he didn’t do it unwillingly and it was necessary, and he wishes that you communicate that to the crew. Cerberus managed to discover information on how the Collectors survive the passage through the Omega 4 Relay, and advanced form of Identification Friend Foe, or IFF. The Illusive Man tells Shepard that each Collector ship is equipped with the device. Make a comment about that. After your conversation decision he tells Shepard that Cerberus has located a Derelict Reaper in the Thorne system of the Hawking Eta Cluster. It is in orbit of the brown dwarf Mnemosyne. He says that the vessel’s mass effect fields keep it aloft and safe, and that he has dispatched a team already to study it. You can make a comment about that. To end the conversation the Illusive Man tells Shepard that a trip through the Omega 4 Relay will likely be a one way trip and that the team needs to be focused on their tasks in order to survive.
After the meeting Jacob, Miranda, and Mordin join you in the briefing room. You can explain the Illusive Man’s actions any way you want. No matter the conversation the general consensus that the mission was a success. EDI comes over the comm and tells you that based on the Collector ship’s course through the Omega 4 Relay she can calculate the location of the Collector homeworld. She brings up a display of the Milky Way and the path ends up in the Galactic Core. That shocks everyone and you can make a comment for a laugh. EDI however counters that she is accurate and considering what the Reapers have already done, a base in the core of the galaxy doesn’t seem all that unlikely when put next to the Mass Relays and the Citadel. At the end of the conversation you have the dialogue options about whether to go after the Reaper IFF immediately or build up the team. It is strongly recommended that you continue to build up the team first.
Enemies
Mission Summary
- Experience: 1,000 (1,250)
- Credits: 75,000
- Cerberus Funds: 37,500
- Credits Found: 37,500
- Resources:
- Element Zero: 500
- Upgrades: