mNo edit summary |
m (Reverted edits by 213.89.108.188 (talk) to last version by Temporaryeditor78) |
||
| (29 intermediate revisions by 16 users not shown) | |||
| Line 18: | Line 18: | ||
=== Infiltrate Grissom Academy === |
=== Infiltrate Grissom Academy === |
||
| − | [[File:GrissomAcademy-NormandyApproach-CerberusFighters-Cutscene.png| |
+ | [[File:GrissomAcademy-NormandyApproach-CerberusFighters-Cutscene.png|340px|right|Normandy distracting the Cerberus Fighters]]On approach, EDI and [[Joker]] will note that there are too many Cerberus ships blockading the Academy for the [[Normandy SR-2|Normandy]] to either sneak by or win a direct fight. [[Kahlee Sanders]] comes over the communications channel requesting aid, and reports that Cerberus have taken over the docking bays. She can open a cargo hold door, however. A cutscene follows showing Joker creating a diversion so that Shepard and the squad can take the shuttle into the school. |
As the squad moves along the corridor, Kahlee reports that she is trapped in the security office just ahead by Cerberus operatives, who are trying to get in. Move to the door and be prepared to fight immediately after opening it. Four [[Assault Trooper]]s are on the other side: Kahlee will immediately kill the two by the door on the right. After dealing with the other two enemies, examine the damaged door. |
As the squad moves along the corridor, Kahlee reports that she is trapped in the security office just ahead by Cerberus operatives, who are trying to get in. Move to the door and be prepared to fight immediately after opening it. Four [[Assault Trooper]]s are on the other side: Kahlee will immediately kill the two by the door on the right. After dealing with the other two enemies, examine the damaged door. |
||
| Line 25: | Line 25: | ||
=== Stranded Students === |
=== Stranded Students === |
||
| − | [[File:Grissom academy ascension wing.png| |
+ | [[File:Grissom academy ascension wing.png|340px|left|Typical frat initiation]]You will be greeted by the sight of Cerberus operatives dragging a student through a doorway. This is a background animation and cannot be interfered with. Pick up the ammo on the couch, if you need it, then proceed through the door to the right. A Cerberus commander will come over the intercom informing students that Cerberus has taken control of the school, and they will be perfectly safe as long as they do not resist. Hop over the wall to the right to pick up the [[Assault Rifle Stability Damper]]. |
Open the door and proceed through. When you round the corner on the left side of the room, you'll find two Assault Troopers talking to a biotic student who has surrounded himself with a barrier. Both troopers have their backs to you, allowing for an easy headshot and the chance to take them both out before they can react. Pick up the datapad (+1250 Credits) at the end of the couch on the right side of the room. If you speak to the boy, Reiley Bellarmine, Shepard will tell him to play dead until the coast is clear and then run back to Kahlee, and he will comply after mentioning that his sister Seanne is still inside the school. Jump over the barrier to proceed. |
Open the door and proceed through. When you round the corner on the left side of the room, you'll find two Assault Troopers talking to a biotic student who has surrounded himself with a barrier. Both troopers have their backs to you, allowing for an easy headshot and the chance to take them both out before they can react. Pick up the datapad (+1250 Credits) at the end of the couch on the right side of the room. If you speak to the boy, Reiley Bellarmine, Shepard will tell him to play dead until the coast is clear and then run back to Kahlee, and he will comply after mentioning that his sister Seanne is still inside the school. Jump over the barrier to proceed. |
||
| − | [[File:Grissom academy headshot.png| |
+ | [[File:Grissom academy headshot.png|340px|right|A bullet in the head if you're not important]]Examine the tactical analysis review (+20 XP) on the desk ahead, pick up the [[SMG Heat Sink]] on the desk in the center of the room, and the personal log (+20 XP) on the desk at the right end of the room. Head through the nearby door. Upon going through the next door after that, you will witness a fleeing student being gunned down by Cerberus troops. Several operatives will then enter through the two doors at the far end of the room. You can take down the Shield Generator near the fallen student to remove their primary means of cover. {{note|Tip:}} Shoot the generator when enemies are standing near it to create a damaging explosion. There will be one or two Assault Troopers, but the bulk of this unit is made up of [[Centurion]]s with full shields. |
Go into the hallway on the left to pick up the [[M-22 Eviscerator]]. Head back past the fallen student and continue through the next room, moving straight ahead. To the left will be Seanne Bellarmine; speak to her quickly, because if you stand around too long she will die from her wounds. One of your squadmates will speak up if you are about to run out of time to save her. On the couch near her is the [[Armor Customization (Mass Effect 3)#Head|Mnemonic Visor]]. There is a locker (+1250 credits) across the room and an [[M-96 Mattock]] on the couch in the middle of the room. Finally, go down the corridor towards Orion Hall. |
Go into the hallway on the left to pick up the [[M-22 Eviscerator]]. Head back past the fallen student and continue through the next room, moving straight ahead. To the left will be Seanne Bellarmine; speak to her quickly, because if you stand around too long she will die from her wounds. One of your squadmates will speak up if you are about to run out of time to save her. On the couch near her is the [[Armor Customization (Mass Effect 3)#Head|Mnemonic Visor]]. There is a locker (+1250 credits) across the room and an [[M-96 Mattock]] on the couch in the middle of the room. Finally, go down the corridor towards Orion Hall. |
||
=== Orion Hall === |
=== Orion Hall === |
||
| − | [[File:Grissom academy orion hall.png| |
+ | [[File:Grissom academy orion hall.png|340px|left|The hall seems smaller with an Atlas around]]As you approach the door, Kahlee will tell you that she has just received an emergency message from the students in Orion Hall. Before entering, take out the generator to the right of the door, which will allow Kahlee to address the students over the PA. She will inform them that help is here, and will warn the students not to let Cerberus take them alive. |
Proceed through the second door at the end of the corridor to see the biotic students defending themselves against Assault Troopers. If an ME2 save was imported and [[Jack]] survived the [[Suicide Mission]], she will be with the students; otherwise, Ensign [[Jason Prangley]] will step up and take charge. |
Proceed through the second door at the end of the corridor to see the biotic students defending themselves against Assault Troopers. If an ME2 save was imported and [[Jack]] survived the [[Suicide Mission]], she will be with the students; otherwise, Ensign [[Jason Prangley]] will step up and take charge. |
||
| Line 42: | Line 42: | ||
The Assault Troopers and Centurions in the middle of the room are fast and may drift dangerously around your flanks, though they often get distracted attacking the students. {{note|Tip:}} On higher difficulty levels, you may want to concentrate on lowering the population of troopers before taking on the Atlas, particularly because it can regenerate its shields if left alone for a time. At the beginning of the encounter, the troopers will be huddled together, so using a few [[Power Combos]] can make quick work of them. |
The Assault Troopers and Centurions in the middle of the room are fast and may drift dangerously around your flanks, though they often get distracted attacking the students. {{note|Tip:}} On higher difficulty levels, you may want to concentrate on lowering the population of troopers before taking on the Atlas, particularly because it can regenerate its shields if left alone for a time. At the beginning of the encounter, the troopers will be huddled together, so using a few [[Power Combos]] can make quick work of them. |
||
| − | After the battle, [[Jack]] punches Shepard in the face. If a male Shepard had a relationship with Jack in ME2, the punch is followed up with a kiss, and the reason given for the punch is Shepard leaving her. Otherwise, the reason given is for previously trusting Cerberus. |
+ | [[File:Grissom Academy Students.png|340px|right|These kids are targeted by Cerberus but they can provide some hefty biotic backup in a pinch]] After the battle, [[Jack]] punches Shepard in the face. If a male Shepard had a relationship with Jack in ME2, the punch is followed up with a kiss, and the reason given for the punch is Shepard leaving her. Otherwise, the reason given is for previously trusting Cerberus. If EDI is present, Jack will comment on her new body. If Garrus is present, Jack will comment on his facial injury from ME2 or on his relationship with female Shepard if he is romanced. |
If Jack is not present, the students say that their CO was killed, leaving Prangley in charge. In addition, without the benefit of Jack as their teacher, a student, Ensign Rodriguez, will ask you if you ever forget the first time you kill someone, giving you extra Paragon or Renegade points. |
If Jack is not present, the students say that their CO was killed, leaving Prangley in charge. In addition, without the benefit of Jack as their teacher, a student, Ensign Rodriguez, will ask you if you ever forget the first time you kill someone, giving you extra Paragon or Renegade points. |
||
| Line 50: | Line 50: | ||
[[Cortez]] comes over the communications channel to say that the Cerberus cruiser is returning, and it's too dangerous for him to keep the shuttle docked for more than another two minutes. Shepard orders him to get back to the Normandy, then informs Kahlee, who comes through with an alternative way out of the facility. |
[[Cortez]] comes over the communications channel to say that the Cerberus cruiser is returning, and it's too dangerous for him to keep the shuttle docked for more than another two minutes. Shepard orders him to get back to the Normandy, then informs Kahlee, who comes through with an alternative way out of the facility. |
||
| − | Relative to where you first entered the room, |
+ | Relative to where you first entered the room, immediately turn left and find a data log (+20 XP) listing Prangley as a high-priority capture target, and the Cerberus camera control. On the opposite side of the room is a Med Kit (+100 XP). In the balcony room where the students are, you will find the [[Assault Rifle Precision Scope]] at the back of the room and a datapad (+1875 Credits) at the front. Use the door override controls in the middle of the back wall to open the door to the Atrium. |
{{note|Tip:}} '''Now is a good time to check if you have leveled up, if you have not done so up to this point.''' |
{{note|Tip:}} '''Now is a good time to check if you have leveled up, if you have not done so up to this point.''' |
||
| − | Head back downstairs. You can speak to Jack for some exposition if she is present. If asked, she will express her opinion that the students are likely better off as support units rather than on the front lines. |
+ | Head back downstairs. You can speak to Jack for some exposition if she is present. If asked, she will express her opinion that the students are likely better off as support units rather than on the front lines. Save here because you won't get to save after you open the door. |
When ready, proceed to the door to the Atrium, located at the end of the corridor under the balcony room. The biotics suggest that they follow a different route to the squad, attacking Cerberus from above. Respond however you like, then get treated to the Cerberus announcer telling the students that the Alliance soldiers are going to get them killed and that they should just surrender. Again, respond how you will. |
When ready, proceed to the door to the Atrium, located at the end of the corridor under the balcony room. The biotics suggest that they follow a different route to the squad, attacking Cerberus from above. Respond however you like, then get treated to the Cerberus announcer telling the students that the Alliance soldiers are going to get them killed and that they should just surrender. Again, respond how you will. |
||
=== Atrium, Part 1 === |
=== Atrium, Part 1 === |
||
| − | [[File:Grissom academy atrium layout 1.png| |
+ | [[File:Grissom academy atrium layout 1.png|340px|right|Take note of the cover and flanking areas]]The next room contains the hardest fight yet. There is an Atlas accompanied by waves of Centurions, [[Guardian]]s, and [[Combat Engineer]]s. Prepare yourself for a long fight. The biotic students will help you with any enemies that stay on the ramp or high enough up on the stairs, but don't depend on them to do too much of the work for you. |
James is a very good choice for this fight because he has the only disable ([[Carnage]]) that isn't blocked by shielding or riot shields, which every enemy in this fight has. Liara is even better if her [[Stasis]] has the "Bubble" upgrade, which will not only disable anything but the Atlas, shields or no, but will also instantly freeze Guardians and remove their shields. Garrus can strip shielding from enemies at long range with Overload, and if equipped with his sniper rifle, will do significant damage to enemies. |
James is a very good choice for this fight because he has the only disable ([[Carnage]]) that isn't blocked by shielding or riot shields, which every enemy in this fight has. Liara is even better if her [[Stasis]] has the "Bubble" upgrade, which will not only disable anything but the Atlas, shields or no, but will also instantly freeze Guardians and remove their shields. Garrus can strip shielding from enemies at long range with Overload, and if equipped with his sniper rifle, will do significant damage to enemies. |
||
| − | [[File:Grissom academy atrium fight 1.png| |
+ | [[File:Grissom academy atrium fight 1.png|340px|left|Cerberus goons]]It might be a good idea to just open the door and stand there, letting the first wave of Centurions and Guardians come to you. In this way, you can take out several enemies before the bulk of them engage you. |
{{note|Insanity Tip:}} If you are VERY cautious about retreating and aware of enemies trying to flank, you can fight almost all Cerberus units except the Atlas from the corridor or just beyond, retreating inside. You are too far away at this point for the Atlas to target you, allowing you to save it for last. The cover inside the corridor is limited to the right side of the door and the gap between the rows of chairs. |
{{note|Insanity Tip:}} If you are VERY cautious about retreating and aware of enemies trying to flank, you can fight almost all Cerberus units except the Atlas from the corridor or just beyond, retreating inside. You are too far away at this point for the Atlas to target you, allowing you to save it for last. The cover inside the corridor is limited to the right side of the door and the gap between the rows of chairs. |
||
| − | After venturing into the Atrium, you'll have to move around from cover to cover in order to stay safe, because there are a lot of enemies and they will all try to flank you. |
+ | After venturing into the Atrium, you'll have to move around from cover to cover in order to stay safe, because there are a lot of enemies and they will all try to flank you. {{note|Note:}} It is possible for the door to close behind Shepard before squadmates have got out, leaving them temporarily trapped inside the corridor. Manually ordering them to a position in the Atrium before you exit will avoid this happening. |
| + | Stay out of the line of fire of any [[Turret (Mass Effect 3)|Turrets]] set up by the Combat Engineers and move around picking off enemies. Infiltrators and Engineers can [[Sabotage]] the Turrets to cause maximum carnage. There are Shield Pylons that you can take out to give yourself an easier time. |
||
| ⚫ | [[File:Grissom academy atrium layout 2.png| |
||
| + | |||
| ⚫ | [[File:Grissom academy atrium layout 2.png|340px|right|Again, take note of the cover and flanking areas]]{{note|Insanity Tip:}} The courtyard is divided into two by a huge wall, and the Atlas is on the other side of that wall and cannot cross. This leads to a second possible strategy, and the safest one for higher difficulty levels: if you turn right from the door you emerged from, you can head up a ramp towards a Shield Pylon right next to the dividing wall. This takes the Atlas out of the fight, and you can also defend from the high ground quite effectively. |
||
The only thing to be wary of is that two Guardians will spawn ''at'' that high ground. Shooting the shield generator in the upper corner, and following with a Stasis Bubble, will usually catch both of them. Whoever is leading the biotic students will shout "Up here!" at the moment they spawn. |
The only thing to be wary of is that two Guardians will spawn ''at'' that high ground. Shooting the shield generator in the upper corner, and following with a Stasis Bubble, will usually catch both of them. Whoever is leading the biotic students will shout "Up here!" at the moment they spawn. |
||
| Line 78: | Line 80: | ||
=== Atrium, Part 2 === |
=== Atrium, Part 2 === |
||
| − | [[File:Grissom academy atrium fight 2.png| |
+ | [[File:Grissom academy atrium fight 2.png|340px|left|Cerberus flanking tactics]]This is the other side of the Atrium. There are one or two Centurions and Guardians and several Combat Engineers, but the bulk of the enemy force is made up of Assault Troopers. The biotics students will continue to help you. |
When planning your cover, be aware that enemies will be arriving over the wall and landing on the level above you. During the battle, Rodriguez will be hit, but don't let the shouts for medi-gel distract you; she'll live. In the Wii U version of the game, the exclusive [[M-597 Ladon]] heavy weapon can be found in this room, which will make this section much easier. |
When planning your cover, be aware that enemies will be arriving over the wall and landing on the level above you. During the battle, Rodriguez will be hit, but don't let the shouts for medi-gel distract you; she'll live. In the Wii U version of the game, the exclusive [[M-597 Ladon]] heavy weapon can be found in this room, which will make this section much easier. |
||
| Line 85: | Line 87: | ||
=== Breather Segment === |
=== Breather Segment === |
||
| ⚫ | [[File:Grissom academy octahvia.png|340px|right|Octavia, random student and Cerberus goons]]There is nothing of interest in this area, so after the enemies are down move through the door at the far end of the Atrium, replenish your ammo if needed, then head through the next door. A computer terminal to the right can be accessed (+4375 Credits). To the left, two of the tech students are fending off two Assault Troopers with a barrier/shield combo device. You can listen to a short conversation between Octavia and the troopers, and then take the troopers out. |
||
| − | [[File:Grissom academy octahvia.png|250px|right|Octavia, random student and Cerberus goons]] |
||
| ⚫ | There is nothing of interest in this area, so after the enemies are down move through the door at the far end of the Atrium, replenish your ammo if needed, then head through the next door. A computer terminal to the right can be accessed (+4375 Credits). To the left, two of the tech students are fending off two Assault Troopers with a barrier/shield combo device. You can listen to a short conversation between Octavia and the troopers, and then take the troopers out. |
||
| − | You can now speak to Octavia, who is understandably distrustful of Shepard. You can either contact Kahlee to convince her that you're a friend, a squadmate can disable the shield, or Shepard can shoot through the shield. If [[Overlord]] was completed in Mass Effect 2 and you followed the Paragon route at the end, [[David Archer]] will be present and will vouch for you. He will unlock the door to a security office at the end of the corridor, which contains another M-96 Mattock, or a M-22 Eviscerator, and a [[ |
+ | You can now speak to Octavia, who is understandably distrustful of Shepard. You can either contact Kahlee to convince her that you're a friend, a squadmate can disable the shield, or Shepard can shoot through the shield. If [[Overlord]] was completed in Mass Effect 2 and you followed the Paragon route at the end, [[David Archer]] will be present and will vouch for you. He will unlock the door to a security office at the end of the corridor, which contains another M-96 Mattock, or a M-22 Eviscerator, and a [[Sniper Rifle Piercing Mod]]. David has some extra dialogue if you have brought [[Garrus]] or [[EDI]] with you. |
Head through the door and collect the [[Citadel: Biotic Amp Interfaces|Biotic Amp Schematics]] from the terminal on the right. In the next room, retrieve the [[Armor Customization (Mass Effect 3)#Chest|Serrice Council Chestplate]] from the couch on the left. |
Head through the door and collect the [[Citadel: Biotic Amp Interfaces|Biotic Amp Schematics]] from the terminal on the right. In the next room, retrieve the [[Armor Customization (Mass Effect 3)#Chest|Serrice Council Chestplate]] from the couch on the left. |
||
| Line 98: | Line 99: | ||
After almost all of the ground troops are down, an enemy Atlas will come through the door where you entered. When Kahlee shouts that "the shuttles are almost ready" you'll know the Atlas will appear soon. {{note|Atlas Tip:}} The secondary missile attack of the Atlas is mainly useful for groups of enemies who aren't in cover; its cooldown period isn't surfaced very intuitively, so just remember it is available to fire approximately every five shots from your main gun. |
After almost all of the ground troops are down, an enemy Atlas will come through the door where you entered. When Kahlee shouts that "the shuttles are almost ready" you'll know the Atlas will appear soon. {{note|Atlas Tip:}} The secondary missile attack of the Atlas is mainly useful for groups of enemies who aren't in cover; its cooldown period isn't surfaced very intuitively, so just remember it is available to fire approximately every five shots from your main gun. |
||
| + | |||
| + | {{note|Tip:}} By bringing the empty Atlas up and parking it right in the doorway at the top of the staircase, you can block the way of the enemy Atlas and prevent it from entering the room, allowing for an easy kill. Leaving an Atlas in the doorway also prevents the door from shutting, meaning you can retreat down the stairs if necessary. |
||
When all hostiles are down, Kahlee will call for you to head to the shuttle. Go through the door at the far right of the room from where you entered. |
When all hostiles are down, Kahlee will call for you to head to the shuttle. Go through the door at the far right of the room from where you entered. |
||
| Line 108: | Line 111: | ||
=== Logs === |
=== Logs === |
||
| − | {{emailquote| |
+ | {{emailquote|Tactical Analysis Review: Student ID #275668 |
| − | Tactical Analysis Review: Student ID #275668 |
||
Unshielded opponent approaching at two o'clock--shielded opponent approaching at twelve o'clock. Both holding heavy pistols. Most effective way to take them down? |
Unshielded opponent approaching at two o'clock--shielded opponent approaching at twelve o'clock. Both holding heavy pistols. Most effective way to take them down? |
||
| Line 122: | Line 124: | ||
The following log appears only if Jack survived the Suicide Mission. |
The following log appears only if Jack survived the Suicide Mission. |
||
| − | {{emailquote| |
+ | {{emailquote|Instructor's Log: |
| − | Instructor's Log: |
||
| − | The kids are getting better at this shit, but I'm worried. I don't think we've got enough time to pull this off and there's just no way |
+ | The kids are getting better at this shit, but I'm worried. I don't think we've got enough time to pull this off and there's just no way they could really survive out there without way more training. Not without any field experience at all. |
Doing my best to get them ready. Didn't think I'd ever care this much. But I won't let anyone hurt 'em. They're my kids. |
Doing my best to get them ready. Didn't think I'd ever care this much. But I won't let anyone hurt 'em. They're my kids. |
||
| Line 133: | Line 134: | ||
| − | {{emailquote| |
+ | {{emailquote|High-Priority Target |
| − | High-Priority Target |
||
Student ID: 12-5D-Prangley |
Student ID: 12-5D-Prangley |
||
Status: Capture priority Alpha. Bring back alive at all costs. |
Status: Capture priority Alpha. Bring back alive at all costs. |
||
| Line 143: | Line 143: | ||
The following log appears only if Jack survived the Suicide Mission. |
The following log appears only if Jack survived the Suicide Mission. |
||
| − | {{emailquote| |
+ | {{emailquote|Mission Brief |
| − | High-priority targets 12-5D-Prangley, 26-2B-Rodriguez |
+ | High-priority targets: 12-5D-Prangley, 26-2B-Rodriguez |
Other subjects are to be retrieved alive if possible. If unavoidable, bring back bodies for use as genetic-testing materials. |
Other subjects are to be retrieved alive if possible. If unavoidable, bring back bodies for use as genetic-testing materials. |
||
| Line 153: | Line 153: | ||
| − | {{emailquote| |
+ | {{emailquote|High-Priority Target |
| − | High-Priority Target |
||
Student ID: 26-2B-Rodriguez |
Student ID: 26-2B-Rodriguez |
||
Status: Capture priority Alpha. Bring back alive at all costs. |
Status: Capture priority Alpha. Bring back alive at all costs. |
||
| Line 161: | Line 160: | ||
}} |
}} |
||
| − | + | == Enemies == |
|
*[[Assault Trooper]] |
*[[Assault Trooper]] |
||
*[[Atlas Mech]] |
*[[Atlas Mech]] |
||
| Line 183: | Line 182: | ||
You can authorize stationing and housing for the Grissom Academy students on the [[Citadel]] from the [[Spectre Terminal]]. This upgrades the value of the [[War Assets/Alien#Citadel Defense Force|Citadel Defense Force]] war asset, which mentions that some of those students are taking over repetitive tasks which cannot be handled by VIs. |
You can authorize stationing and housing for the Grissom Academy students on the [[Citadel]] from the [[Spectre Terminal]]. This upgrades the value of the [[War Assets/Alien#Citadel Defense Force|Citadel Defense Force]] war asset, which mentions that some of those students are taking over repetitive tasks which cannot be handled by VIs. |
||
| − | === |
+ | ===E-mail=== |
After the evacuation, Kahlee will send an e-mail to the Commander, forwarded by Admiral Hackett. |
After the evacuation, Kahlee will send an e-mail to the Commander, forwarded by Admiral Hackett. |
||
{{emailquote|Fwd: Thank you |
{{emailquote|Fwd: Thank you |
||
----From: Steven Hackett |
----From: Steven Hackett |
||
| − | <nowiki>---------- Forwarded |
+ | <nowiki>---------- Forwarded message ----------</nowiki> |
From: Kahlee Sanders |
From: Kahlee Sanders |
||
| − | Subject: Thank |
+ | Subject: Thank you |
To: Steven Hackett |
To: Steven Hackett |
||
| Line 197: | Line 196: | ||
I didn't have time to thank you properly after you got us out of the academy, and Admiral Hackett agreed to send this your way. |
I didn't have time to thank you properly after you got us out of the academy, and Admiral Hackett agreed to send this your way. |
||
| − | While my students are out on duty, I'm doing what I can to help with the Crucible. It's an amazing project, more advanced than anything I've seen before. Some of my more tech-minded kids are staying back to help out |
+ | While my students are out on duty, I'm doing what I can to help with the Crucible. It's an amazing project, more advanced than anything I've ever seen before. Some of my more tech-minded kids are staying back to help out too, and watching them work... it's the future, Commander. This project will inform human progress for generations. |
And they'll have you to thank for it. |
And they'll have you to thank for it. |
||
| Line 218: | Line 217: | ||
<!-- Interwiki links --> |
<!-- Interwiki links --> |
||
[[de:Grissom-Akademie: Notevakuierung]] |
[[de:Grissom-Akademie: Notevakuierung]] |
||
| + | [[fr:Académie Grissom : évacuation d'urgence]] |
||
[[ru:Гриссомская академия: эвакуация]] |
[[ru:Гриссомская академия: эвакуация]] |
||
[[Category:Missions]] |
[[Category:Missions]] |
||
Revision as of 04:32, 25 December 2019
Grissom Academy is under attack by Cerberus forces attempting to kidnap the students. Rescue the students and evacuate the station.
Acquisition
After the Palaven mission and EDI's formal squadmate introduction, Samantha Traynor will ask through ambient dialogue to speak with you.
She was scanning Alliance comm channels and came across an evac request from the Academy. A turian vessel has responded to the call, but Traynor thought something was off in their signal. After working with EDI, Traynor believes the signal came from Cerberus, and that the Academy is still in danger. If your Shepard was imported from Mass Effect 2, the situation seems familiar.
Warning: If you do not complete the mission before Priority: The Citadel II, it will be no longer available and considered failed.
Preparation
You will be fighting an abundance of Cerberus infantry AND mech support. If they aren't shielded, they will have Shield Pylons nearby to rectify that. As such, prioritize shield-stripping and detonating tech bursts to synergize with appropriate powers such as Overload and Disruptor Ammo. The second priority is armor destruction: abilities that can reliably strip armor as well as set off fire explosions can be put to good use in this mission.
Your normal weapon loadout should serve you well, but if you're having trouble with the mission, try equipping the Venom Shotgun, as its charged shot will instantly destroy pairs of even the tougher enemies on any difficulty level, and it will come in especially handy during a particularly challenging segment.
Walkthrough
Travel to the Petra Nebula, and enter orbit at Grissom Academy.
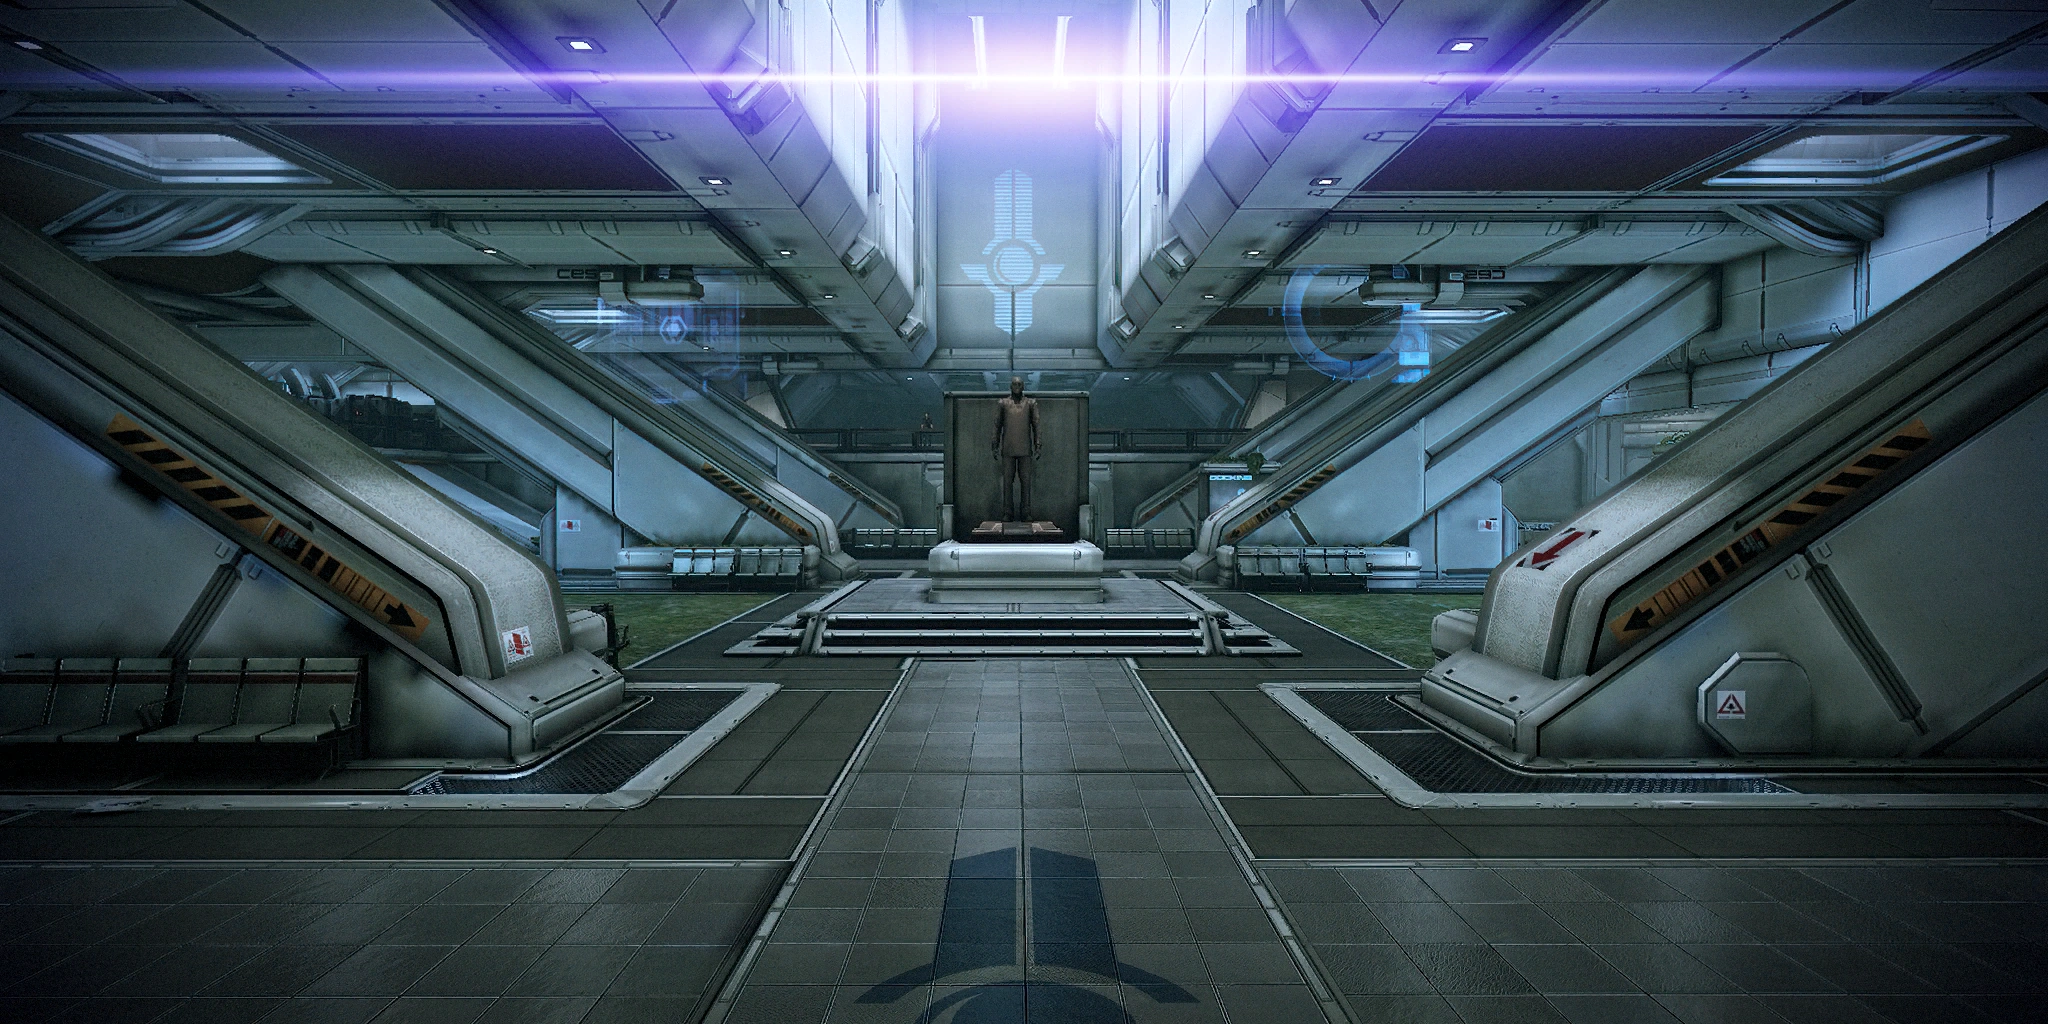
Infiltrate Grissom Academy
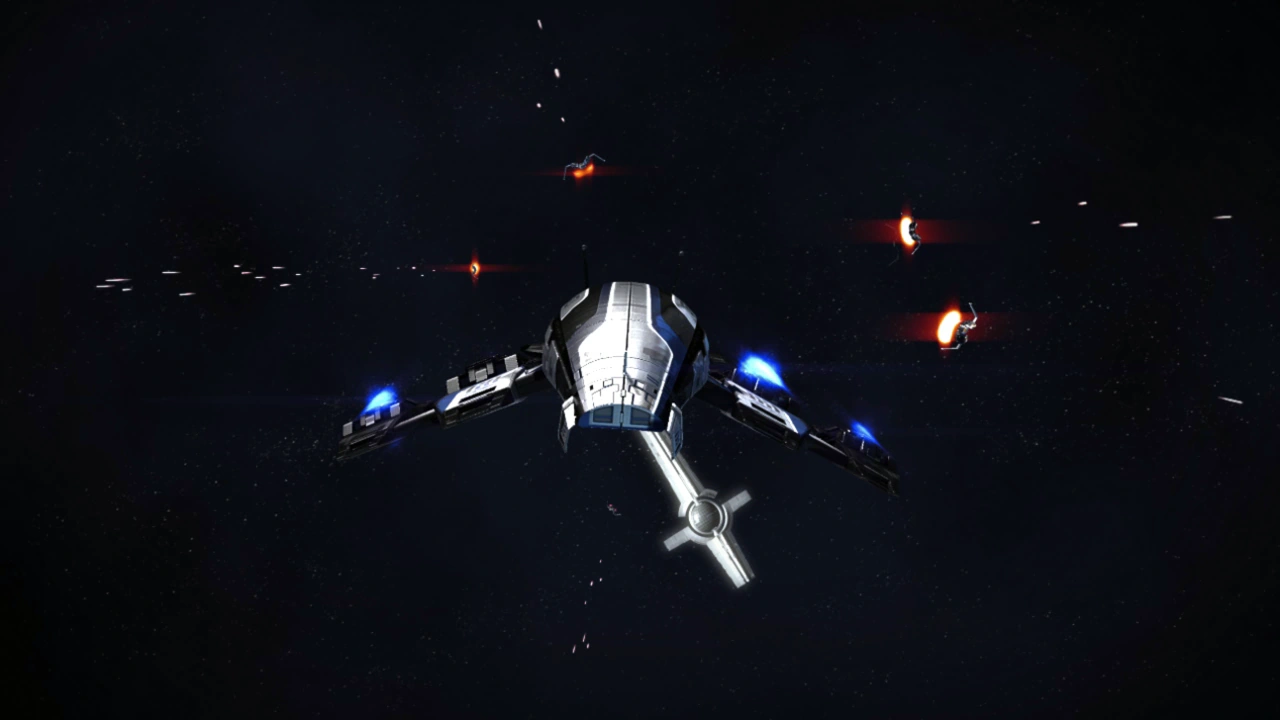
On approach, EDI and Joker will note that there are too many Cerberus ships blockading the Academy for the Normandy to either sneak by or win a direct fight. Kahlee Sanders comes over the communications channel requesting aid, and reports that Cerberus have taken over the docking bays. She can open a cargo hold door, however. A cutscene follows showing Joker creating a diversion so that Shepard and the squad can take the shuttle into the school.
As the squad moves along the corridor, Kahlee reports that she is trapped in the security office just ahead by Cerberus operatives, who are trying to get in. Move to the door and be prepared to fight immediately after opening it. Four Assault Troopers are on the other side: Kahlee will immediately kill the two by the door on the right. After dealing with the other two enemies, examine the damaged door.
Inside, you are greeted by Kahlee, who has some flattering things to say about Shepard. She will inform you that there are fewer than twenty students remaining at the school, most of whom are either producing tech for the Alliance or are biotics in training for military service. If you ask about Admiral Anderson, you will find out that he and Sanders go back to the time when he was a Spectre candidate. Proceed through the conversation however you see fit, but it will be interrupted by news that Cerberus has a group of students trapped in Orion Hall. Shepard will rejoin the squad in the corridor and Kahlee will open the door at its far end.
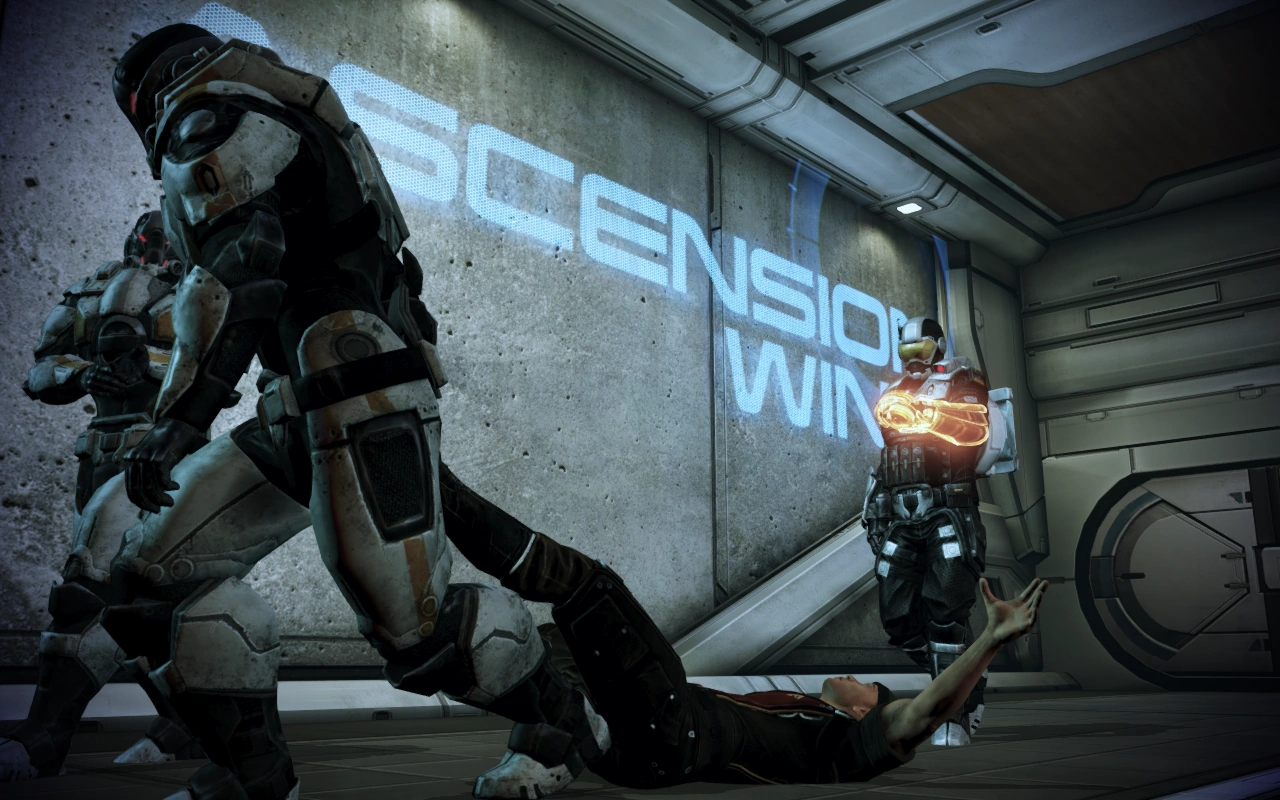
Stranded Students
You will be greeted by the sight of Cerberus operatives dragging a student through a doorway. This is a background animation and cannot be interfered with. Pick up the ammo on the couch, if you need it, then proceed through the door to the right. A Cerberus commander will come over the intercom informing students that Cerberus has taken control of the school, and they will be perfectly safe as long as they do not resist. Hop over the wall to the right to pick up the Assault Rifle Stability Damper.
Open the door and proceed through. When you round the corner on the left side of the room, you'll find two Assault Troopers talking to a biotic student who has surrounded himself with a barrier. Both troopers have their backs to you, allowing for an easy headshot and the chance to take them both out before they can react. Pick up the datapad (+1250 Credits) at the end of the couch on the right side of the room. If you speak to the boy, Reiley Bellarmine, Shepard will tell him to play dead until the coast is clear and then run back to Kahlee, and he will comply after mentioning that his sister Seanne is still inside the school. Jump over the barrier to proceed.
Examine the tactical analysis review (+20 XP) on the desk ahead, pick up the SMG Heat Sink on the desk in the center of the room, and the personal log (+20 XP) on the desk at the right end of the room. Head through the nearby door. Upon going through the next door after that, you will witness a fleeing student being gunned down by Cerberus troops. Several operatives will then enter through the two doors at the far end of the room. You can take down the Shield Generator near the fallen student to remove their primary means of cover. Tip: Shoot the generator when enemies are standing near it to create a damaging explosion. There will be one or two Assault Troopers, but the bulk of this unit is made up of Centurions with full shields.
Go into the hallway on the left to pick up the M-22 Eviscerator. Head back past the fallen student and continue through the next room, moving straight ahead. To the left will be Seanne Bellarmine; speak to her quickly, because if you stand around too long she will die from her wounds. One of your squadmates will speak up if you are about to run out of time to save her. On the couch near her is the Mnemonic Visor. There is a locker (+1250 credits) across the room and an M-96 Mattock on the couch in the middle of the room. Finally, go down the corridor towards Orion Hall.
Orion Hall
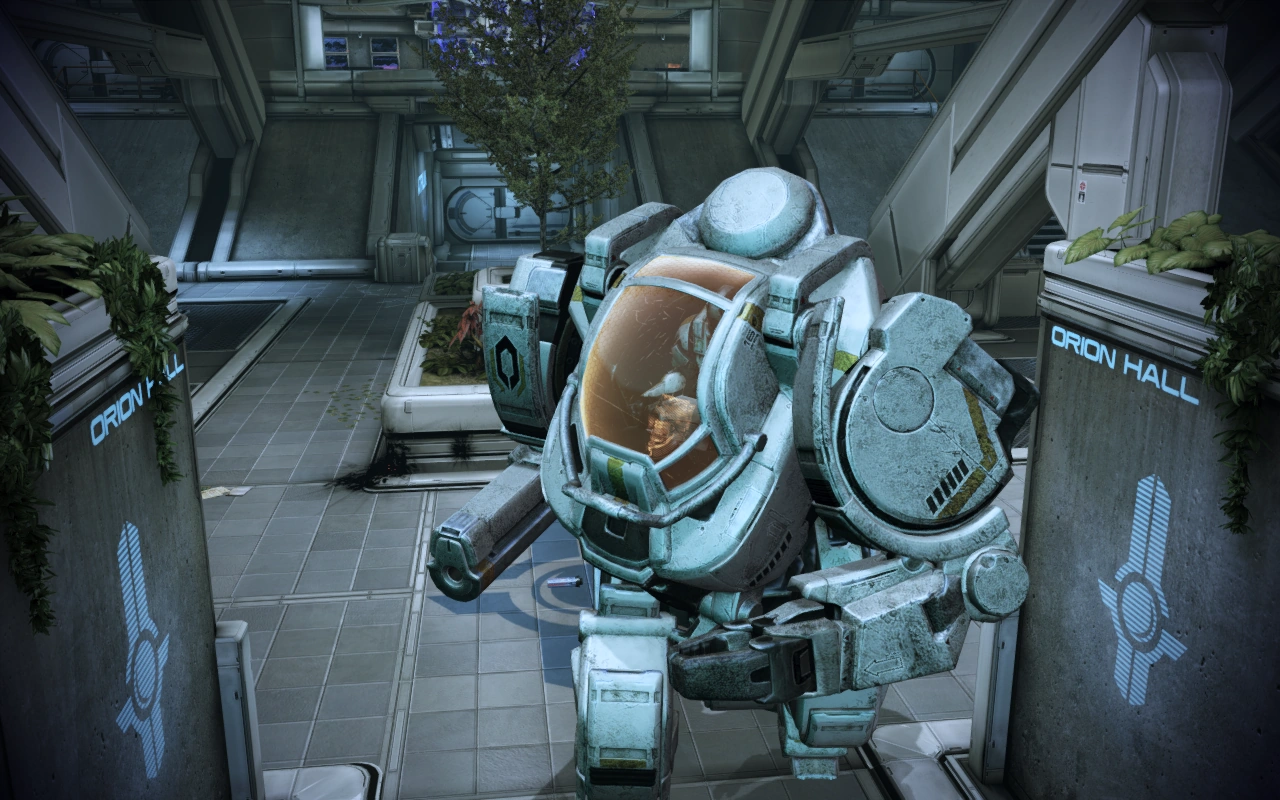
As you approach the door, Kahlee will tell you that she has just received an emergency message from the students in Orion Hall. Before entering, take out the generator to the right of the door, which will allow Kahlee to address the students over the PA. She will inform them that help is here, and will warn the students not to let Cerberus take them alive.
Proceed through the second door at the end of the corridor to see the biotic students defending themselves against Assault Troopers. If an ME2 save was imported and Jack survived the Suicide Mission, she will be with the students; otherwise, Ensign Jason Prangley will step up and take charge.
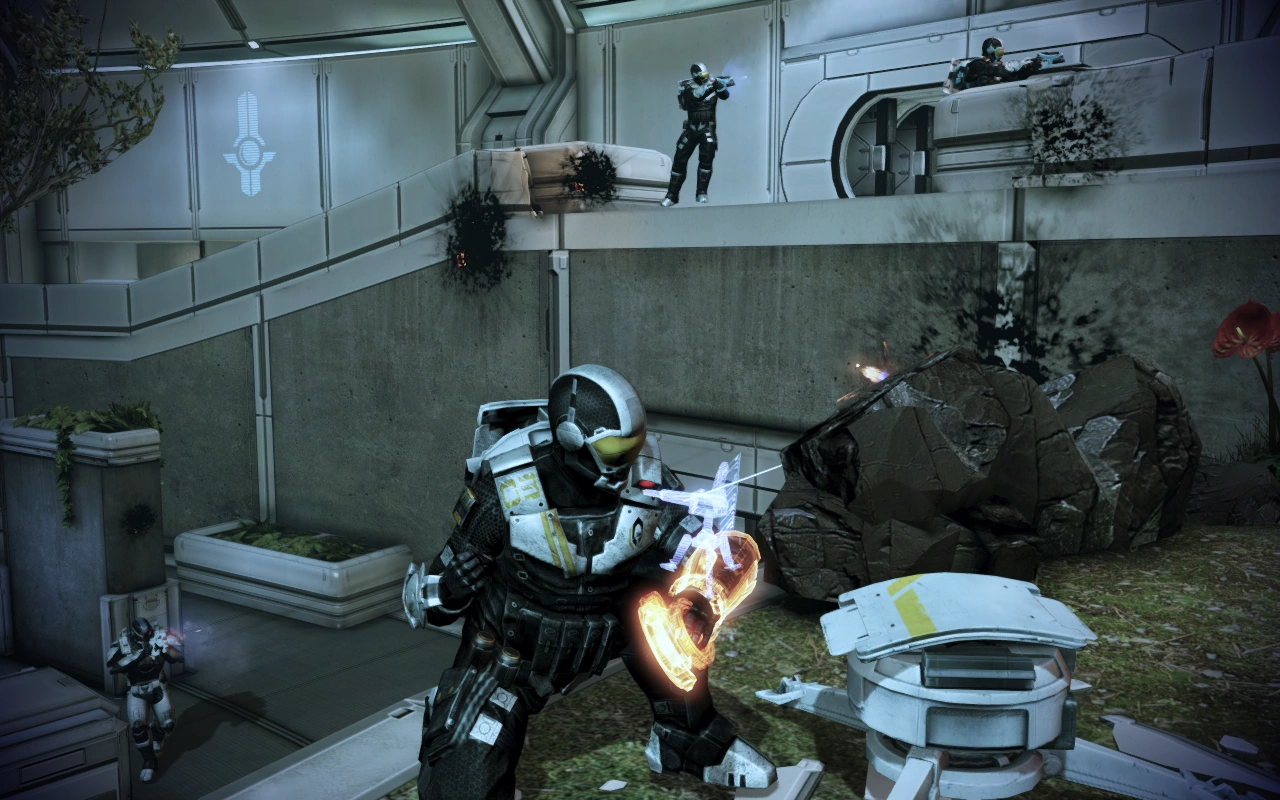
An Atlas breaks into the room. The students retreat behind a biotic barrier; you must defeat the enemies before the barrier wears down. The Atlas is dangerous if you get in its line of fire, but it is slow and will not take any more interest in Shepard than in your squadmates.
The Assault Troopers and Centurions in the middle of the room are fast and may drift dangerously around your flanks, though they often get distracted attacking the students. Tip: On higher difficulty levels, you may want to concentrate on lowering the population of troopers before taking on the Atlas, particularly because it can regenerate its shields if left alone for a time. At the beginning of the encounter, the troopers will be huddled together, so using a few Power Combos can make quick work of them.
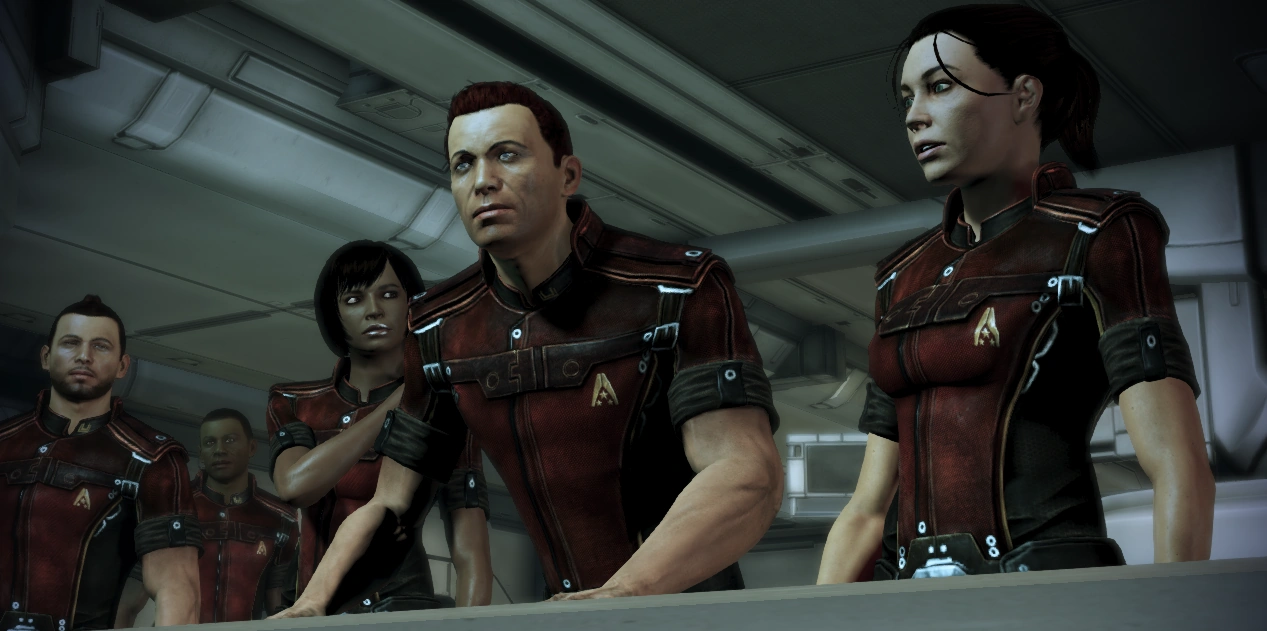
After the battle, Jack punches Shepard in the face. If a male Shepard had a relationship with Jack in ME2, the punch is followed up with a kiss, and the reason given for the punch is Shepard leaving her. Otherwise, the reason given is for previously trusting Cerberus. If EDI is present, Jack will comment on her new body. If Garrus is present, Jack will comment on his facial injury from ME2 or on his relationship with female Shepard if he is romanced.
If Jack is not present, the students say that their CO was killed, leaving Prangley in charge. In addition, without the benefit of Jack as their teacher, a student, Ensign Rodriguez, will ask you if you ever forget the first time you kill someone, giving you extra Paragon or Renegade points.
The students will now need a few minutes to recharge, since they've been constantly fending off Cerberus operatives for hours.
Cortez comes over the communications channel to say that the Cerberus cruiser is returning, and it's too dangerous for him to keep the shuttle docked for more than another two minutes. Shepard orders him to get back to the Normandy, then informs Kahlee, who comes through with an alternative way out of the facility.
Relative to where you first entered the room, immediately turn left and find a data log (+20 XP) listing Prangley as a high-priority capture target, and the Cerberus camera control. On the opposite side of the room is a Med Kit (+100 XP). In the balcony room where the students are, you will find the Assault Rifle Precision Scope at the back of the room and a datapad (+1875 Credits) at the front. Use the door override controls in the middle of the back wall to open the door to the Atrium.
Tip: Now is a good time to check if you have leveled up, if you have not done so up to this point.
Head back downstairs. You can speak to Jack for some exposition if she is present. If asked, she will express her opinion that the students are likely better off as support units rather than on the front lines. Save here because you won't get to save after you open the door.
When ready, proceed to the door to the Atrium, located at the end of the corridor under the balcony room. The biotics suggest that they follow a different route to the squad, attacking Cerberus from above. Respond however you like, then get treated to the Cerberus announcer telling the students that the Alliance soldiers are going to get them killed and that they should just surrender. Again, respond how you will.
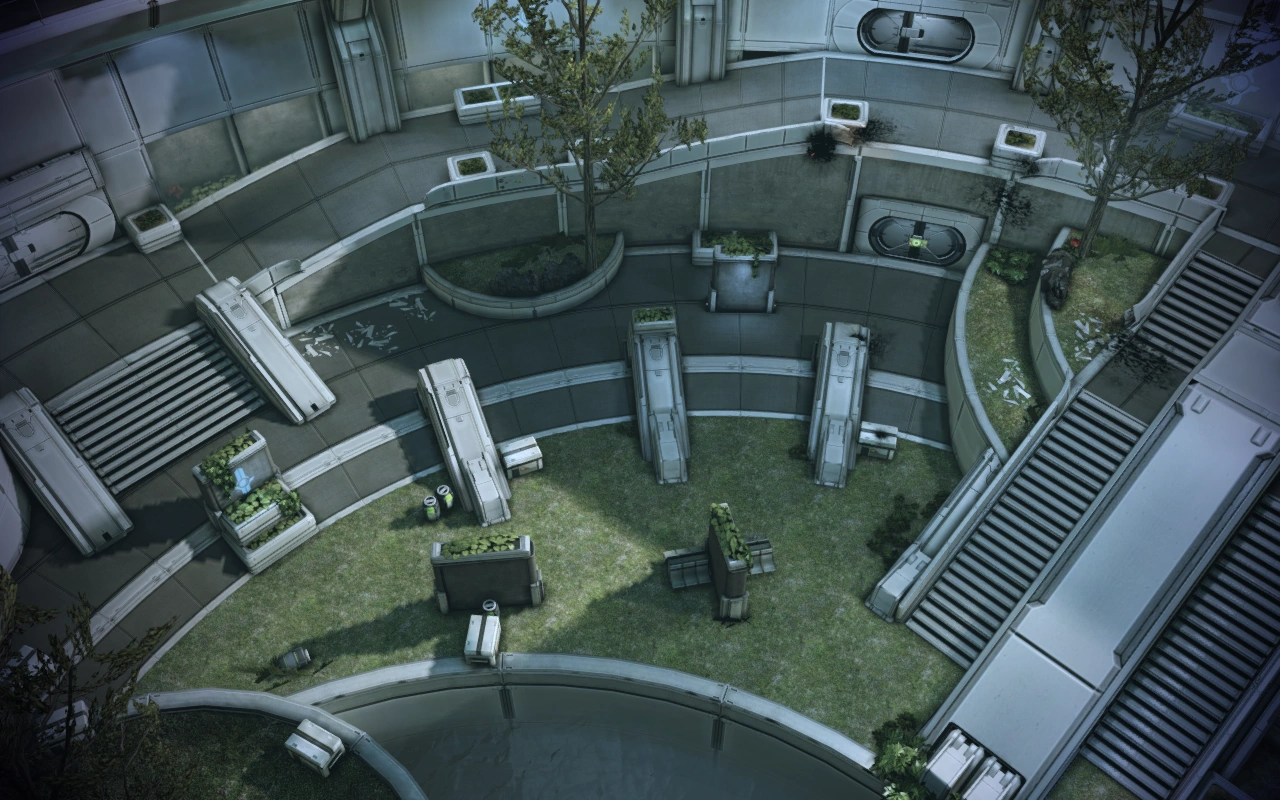
Atrium, Part 1
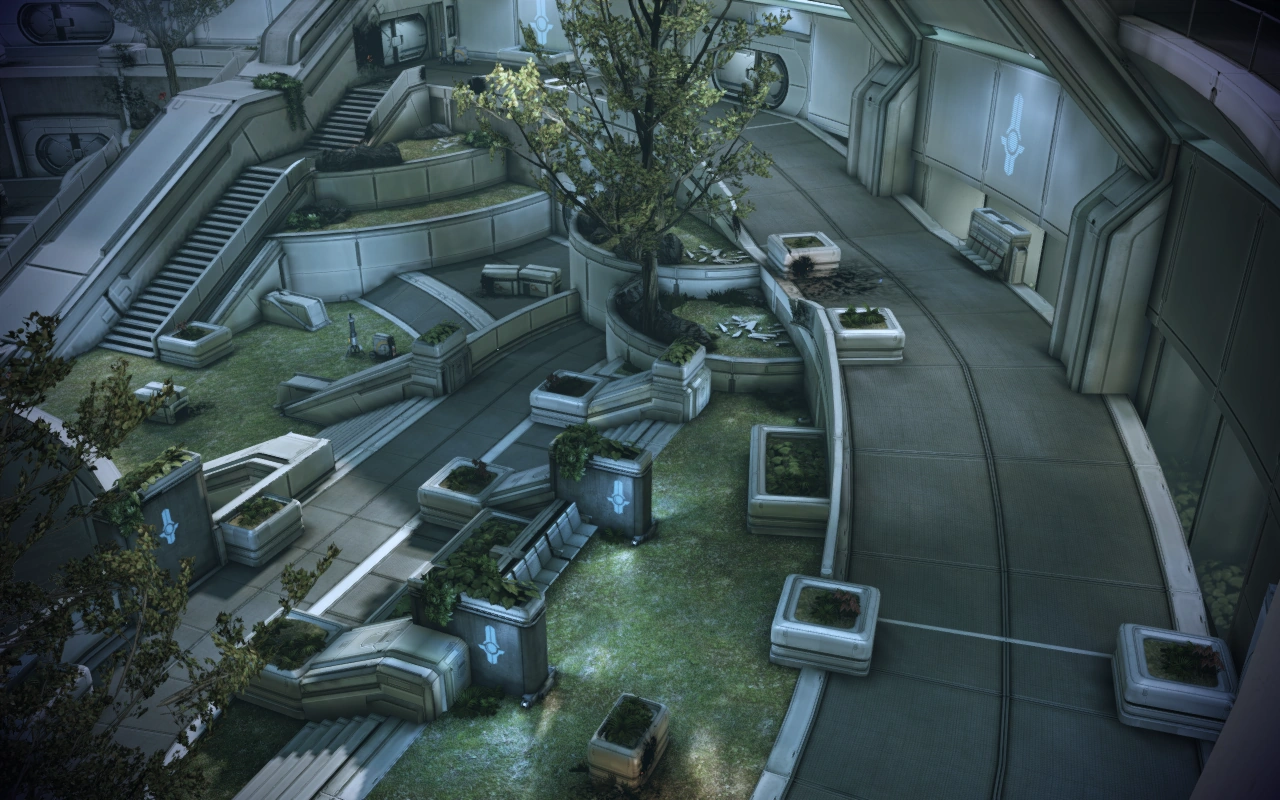
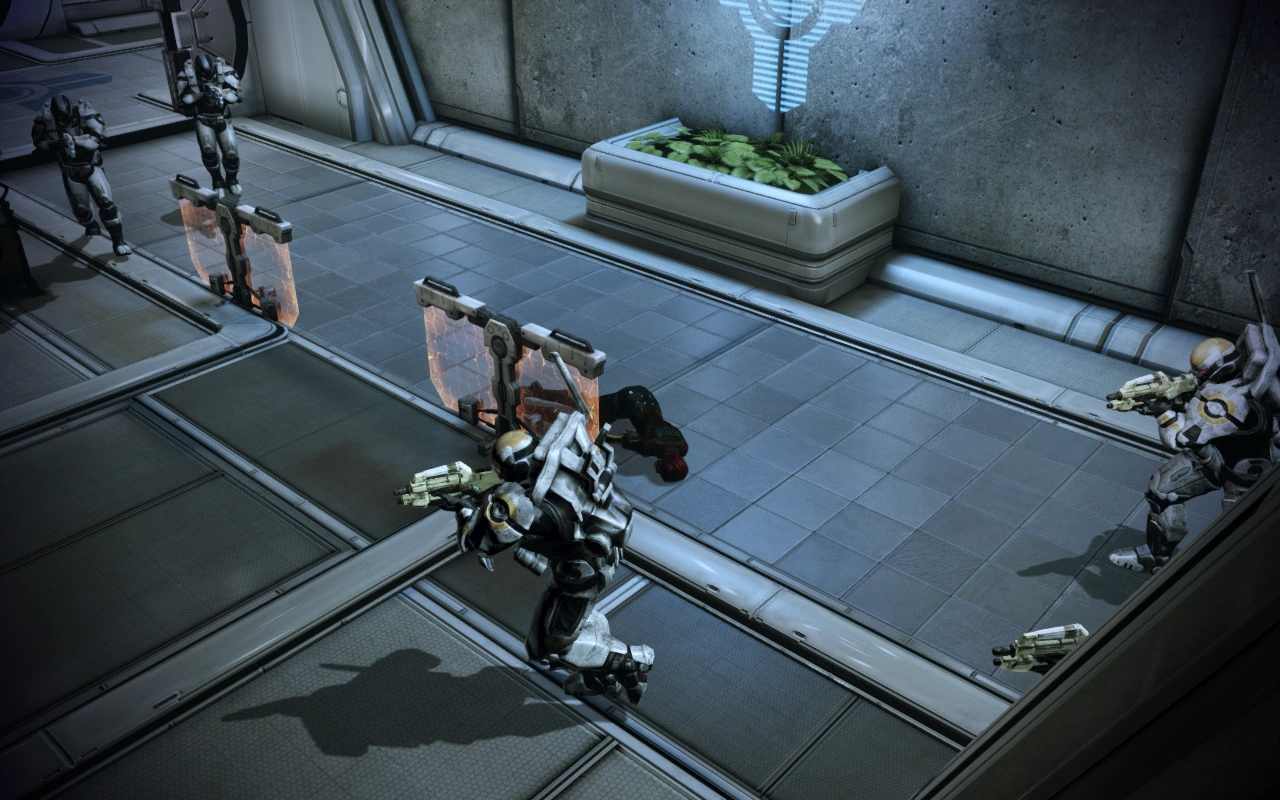
The next room contains the hardest fight yet. There is an Atlas accompanied by waves of Centurions, Guardians, and Combat Engineers. Prepare yourself for a long fight. The biotic students will help you with any enemies that stay on the ramp or high enough up on the stairs, but don't depend on them to do too much of the work for you.
James is a very good choice for this fight because he has the only disable (Carnage) that isn't blocked by shielding or riot shields, which every enemy in this fight has. Liara is even better if her Stasis has the "Bubble" upgrade, which will not only disable anything but the Atlas, shields or no, but will also instantly freeze Guardians and remove their shields. Garrus can strip shielding from enemies at long range with Overload, and if equipped with his sniper rifle, will do significant damage to enemies.
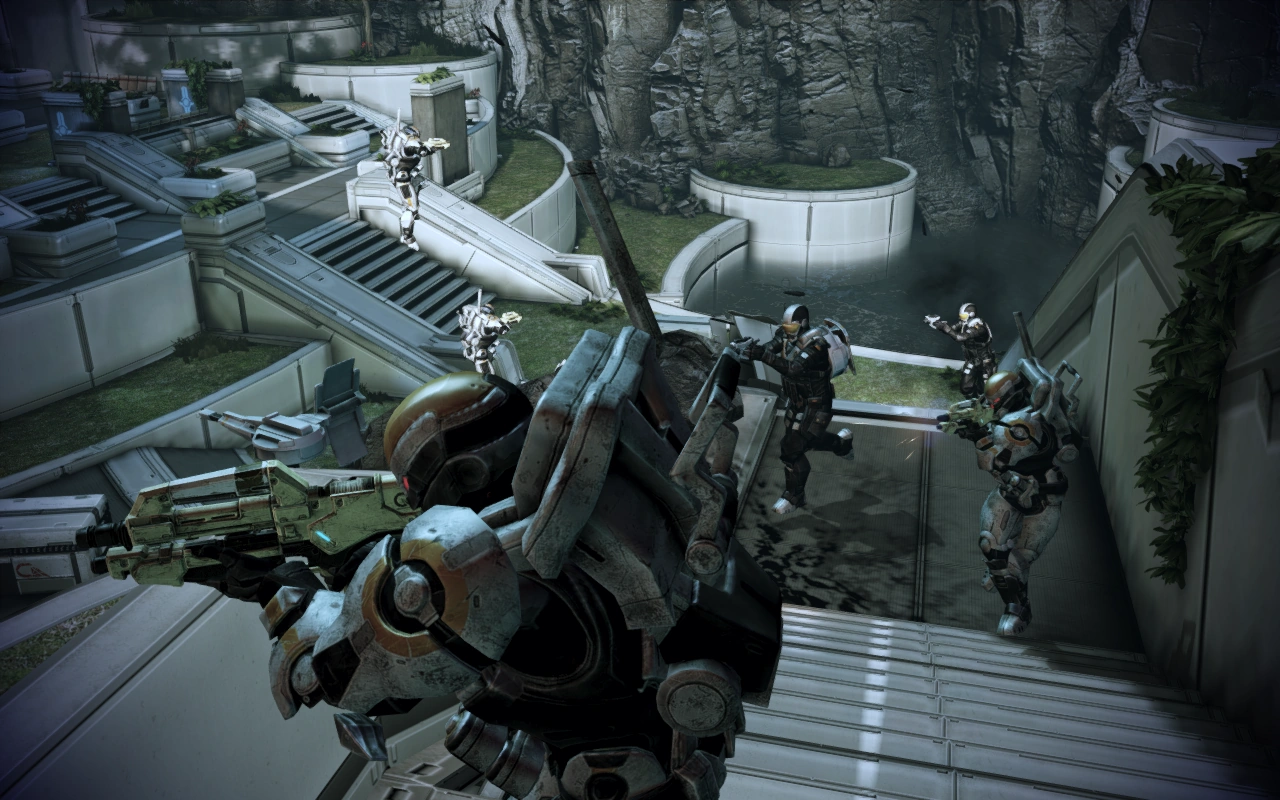
It might be a good idea to just open the door and stand there, letting the first wave of Centurions and Guardians come to you. In this way, you can take out several enemies before the bulk of them engage you.
Insanity Tip: If you are VERY cautious about retreating and aware of enemies trying to flank, you can fight almost all Cerberus units except the Atlas from the corridor or just beyond, retreating inside. You are too far away at this point for the Atlas to target you, allowing you to save it for last. The cover inside the corridor is limited to the right side of the door and the gap between the rows of chairs.
After venturing into the Atrium, you'll have to move around from cover to cover in order to stay safe, because there are a lot of enemies and they will all try to flank you. Note: It is possible for the door to close behind Shepard before squadmates have got out, leaving them temporarily trapped inside the corridor. Manually ordering them to a position in the Atrium before you exit will avoid this happening.
Stay out of the line of fire of any Turrets set up by the Combat Engineers and move around picking off enemies. Infiltrators and Engineers can Sabotage the Turrets to cause maximum carnage. There are Shield Pylons that you can take out to give yourself an easier time.
Insanity Tip: The courtyard is divided into two by a huge wall, and the Atlas is on the other side of that wall and cannot cross. This leads to a second possible strategy, and the safest one for higher difficulty levels: if you turn right from the door you emerged from, you can head up a ramp towards a Shield Pylon right next to the dividing wall. This takes the Atlas out of the fight, and you can also defend from the high ground quite effectively.
The only thing to be wary of is that two Guardians will spawn at that high ground. Shooting the shield generator in the upper corner, and following with a Stasis Bubble, will usually catch both of them. Whoever is leading the biotic students will shout "Up here!" at the moment they spawn.
The rest of the fight should be fairly straightforward. If you're carrying the Venom Shotgun, you can charge its shots to annihilate the Cerberus forces as they attempt to land just below you. Finally, take the Atlas out, because next you're going over to its half of the courtyard.
After all of the enemies are down, replenish your ammo and move through the door on the lower level. Pick up the mission brief (+20 XP) on the chairs on the left, open the Med Kit (+100 XP) on the right, and pick up any additional ammo you need. Use the computer on the left farther down the corridor (+3750 Credits). If you had not leveled up earlier, check and see if you have now before moving through the door.
Atrium, Part 2
This is the other side of the Atrium. There are one or two Centurions and Guardians and several Combat Engineers, but the bulk of the enemy force is made up of Assault Troopers. The biotics students will continue to help you.
When planning your cover, be aware that enemies will be arriving over the wall and landing on the level above you. During the battle, Rodriguez will be hit, but don't let the shouts for medi-gel distract you; she'll live. In the Wii U version of the game, the exclusive M-597 Ladon heavy weapon can be found in this room, which will make this section much easier.
Insanity Tip: After opening the door and thus triggering the new wave of enemies to appear, one can return to the first side of the room and no enemies will follow. This way, enemies can be taken out relatively safely. Note, however, that there may be a few enemies and Turrets that might not be visible from the first side. When no hostiles remain, Kahlee will update Shepard on Cerberus activity.
Breather Segment
There is nothing of interest in this area, so after the enemies are down move through the door at the far end of the Atrium, replenish your ammo if needed, then head through the next door. A computer terminal to the right can be accessed (+4375 Credits). To the left, two of the tech students are fending off two Assault Troopers with a barrier/shield combo device. You can listen to a short conversation between Octavia and the troopers, and then take the troopers out.
You can now speak to Octavia, who is understandably distrustful of Shepard. You can either contact Kahlee to convince her that you're a friend, a squadmate can disable the shield, or Shepard can shoot through the shield. If Overlord was completed in Mass Effect 2 and you followed the Paragon route at the end, David Archer will be present and will vouch for you. He will unlock the door to a security office at the end of the corridor, which contains another M-96 Mattock, or a M-22 Eviscerator, and a Sniper Rifle Piercing Mod. David has some extra dialogue if you have brought Garrus or EDI with you.
Head through the door and collect the Biotic Amp Schematics from the terminal on the right. In the next room, retrieve the Serrice Council Chestplate from the couch on the left.
Endgame Mayhem
The next room has an empty Atlas and a Combat Engineer, who is standing with his back to you. Open the Med Kit (+100 XP) on the couch on your right, and access the engineer's data log on the floor (+20 XP) to find out that Rodriguez is another high-priority target for Cerberus indoctrination. If you wish, you can climb into the Atlas and head up the stairs to the docking area. There is an SMG Magazine Upgrade on the bench to the left of the entrance you came in: remember to pick it up after the fighting. You can also examine the statue of Jon Grissom in the middle of the room.
There will be many waves of Assault Troopers, Guardians, and Centurions, but you should be able to handle all of them from the Atlas. Just be sure to be near cover if your armor starts to get dangerously low, because you will want to evacuate. However, even on Insanity, the Atlas is pretty sturdy. There will be several waves of ground troops emerging from various points around the room.
After almost all of the ground troops are down, an enemy Atlas will come through the door where you entered. When Kahlee shouts that "the shuttles are almost ready" you'll know the Atlas will appear soon. Atlas Tip: The secondary missile attack of the Atlas is mainly useful for groups of enemies who aren't in cover; its cooldown period isn't surfaced very intuitively, so just remember it is available to fire approximately every five shots from your main gun.
Tip: By bringing the empty Atlas up and parking it right in the doorway at the top of the staircase, you can block the way of the enemy Atlas and prevent it from entering the room, allowing for an easy kill. Leaving an Atlas in the doorway also prevents the door from shutting, meaning you can retreat down the stairs if necessary.
When all hostiles are down, Kahlee will call for you to head to the shuttle. Go through the door at the far right of the room from where you entered.
A cutscene will play showing the students and your squad rushing for the shuttle, where it is discovered that the wounded Rodriguez has fallen behind and is being pursued by Cerberus operatives. Shepard will attempt to break through the glass separating the rooms to get to her, but whoever is in charge of the biotics squad will biotically smash the glass first. If it's Jack, everyone makes it to the shuttle. If it's Prangley, he is shot and killed.
Once inside the shuttle, if Jack isn't around, Kahlee will request that Shepard rethink having the students play a military role. Otherwise, she will state that perhaps they are ready for front-line combat after all. Make your choice.
You will then be returned to the Normandy for a video conference with Anderson, who will discuss the war and ask about Kahlee. Following the conversation, you will receive 12,500 credits in Alliance funding.
Logs
The following log appears only if Jack survived the Suicide Mission.
The following log appears only if Jack survived the Suicide Mission.
Enemies
Aftermath
Normandy
If Javik is part of your crew, you will find him in the walkway beneath engineering following this mission. He will comment about Jack's previous tenure in this room.
War Assets
By choosing "We'll use them as support.", they get rolled in with the Alliance 103rd Marine Division. This adds 50 war assets to the 103rd and earns you Paragon points.
By choosing "They're ready for battle.", they will become a Biotic Company in the Alliance. This adds 75 war assets and gets you Renegade points.
In the Extended Cut, Jack's slide in the epilogue will be determined based on this choice. If sent to support roles, Jack will be shown back with her class. If sent to combat roles, Jack is shown mourning at their graves.
Citadel Spectre Terminal
You can authorize stationing and housing for the Grissom Academy students on the Citadel from the Spectre Terminal. This upgrades the value of the Citadel Defense Force war asset, which mentions that some of those students are taking over repetitive tasks which cannot be handled by VIs.
After the evacuation, Kahlee will send an e-mail to the Commander, forwarded by Admiral Hackett.
Expiration
If the mission is not completed before Priority: The Citadel II, it will expire. Aside from the obvious consequences of losing experience points, credits, the large number of weapon upgrades mentioned above, and the possibility of rekindling a romance with Jack if one was begun in Mass Effect 2, this will also have plot consequences: during Priority: Cerberus Headquarters, Shepard will encounter Jack, who was captured by Cerberus and was turned into a Phantom, and be forced to fight and kill her. Also, if you completed Overlord and sent David Archer to the Grissom Academy, you will meet Dr. Gavin Archer during the mission Arrae: Ex-Cerberus Scientists, where, depending on what you say, he may or may not kill himself for not getting the chance to apologize for his unjust actions.
Trivia
- When acquiring this mission, if Shepard is an Adept, Vanguard, or Sentinel, Traynor will mention how Shepard might have gone to the same school for his or her biotic abilities, had it been open twenty years prior.
- According to Patrick Weekes, the plot for this mission was inspired by the attack on the X-Mansion in the film X-Men 2, with Jack as Wolverine.[1]
- Taking the Atlas near the end of the mission, the one without a driver, is not considered a hijacking and will not unlock the Hijacker Achievement.